Tricia, the winner of my super fabulous give away, is SUCH an awesome girl! She is a member of a discussion forum I belong to, the Disboards and one thread in particular THE DISBOUTIQUERS! They are a group of fabulous crafting mamas who are so kind, caring and giving. Tricia is NO exception. She happens to be a super huge Scientific Seamstress fan (who isn't?) and has ALL of Carla's patterns already. Rather than sub out the pattern for another prize she suggested that she share the wealth and allow me to draw another random number for the Simply Sweet Tops and Dresses pattern.
So without further ado, the winner of the pattern is....ANDI!!!!

Monday, July 12, 2010

Sunday, July 11, 2010
YOU Too Can Make a Cake.
Yesterday I was thwarted in my cake decorating attempts by a birthday girl with a fever of 103. Today she was feeling better so I sent her to my mom's house. :) Mmmmm. Cake. Cake is one of my favorite things.
I have NEVER decorated a cake. I have rarely even made a cake, though I bake quite a lot. I've attempted to make them and decorate them for my childrens birthdays but they have always ended up being decorated by my mom. My mom makes cakes that look like this (Lily's 4th birthday cake.)
She and a friend worked in a grocery store bakery when I was a child and eventually started decorating cakes for local families from our house. She is an artist and cakes were only one way for her to express her talents. I am NOT an artist. I do not have her keen eye or steady hand. Any attempt at cake decorating turned into my mother stealthily taking over the icing bag. One year I wanted to make a Buzz light year cake for my son. She let me do the sky. Truth be told I probably never really minded her doing the work because then I didn't have to submit my sub par work for her approval.
THAT ALL CHANGED TODAY! I was resolved that this year I WOULD make the girls birthday cake (it was a joint party for both of my girls Violet's on the 10th and Lily's on the 19th). I had seen a mickey icon inspired cake on the web and thought "HEY! I can do that!" Did I bookmark the instructions? No. Could I find them after an hour of scouring the net? No. I would have to go it alone. Or at least with only the help of my dear husband Brandon, who is himself an artist so I was glad to have his eyes (and sometimes hands) on the project.
Aside from giving you a glimpse into my first try at cake decorating and my love of cake I'm also letting you in on another favorite (read: obsession) of mine. The Mouse. I love all things Disney. I live a short one hour and 50 minutes, door to door, from The World. Fortunately my kids and my hubby love Disney too or at least he tolerates it for us.
NOTE: I am generally the crafting for dummies test subject. If I can do it I usually feel pretty confident that ANYONE can do it. This is certainly no exception to that. I have little to NO cake decorating experience and few actual decorating tools.
Here we go, my first tutorial. HOW TO MAKE A MICKEY ICON CAKE.
THIS is what it looks like finished. It is not a precise thing, there was a lot of playing and fidgeting. So if yours looks slightly different that's ok, as long as it looks like a Mickey head ;) I wish the pictures were better, the silver tin foil isn't the best background and I was using my dad's camera which I was not at all familiar with. I will work on better pictures in the future. It's really not wonky, it's just the angle.

I made it with polka dots so the girls would say it was a Minnie cake. Polka dots always mean Minnie Mouse and I couldn't wrap my head around making a bow.
For this cake start with 2 10" round cakes and 2-4 6" round cakes. Preferably 4. I over filled my 6" pans and didn't have another cake mix (I did NOT make these from scratch *gasp*) so I tried to make due with the 2 I had. You'll see that fiasco a little later. The Nuk is not necessary.
Because I over filled my 6" pans they were considerably taller than my 10" cakes. They weren't quite as tall, however, as my 2 10" cakes stacked. My clever answer to this was to shave the rounded top part of the 10" cakes to make them flatter and a little shorter. That still didn't make the 10" cakes short enough so I had to make the 6" cakes a little taller. I cut them in half and when we added filling I also added pieces of the tops I cut off of the 10" cakes.
THIS is where you learn from my fumbling mistakes and fill ALL of the 2" deep pans equally so that they are all relatively the same height. Make 4 normal sized 6" cakes and bypass that whole shaving and filling part. Filling the pans correctly will also eliminate the rounded puffy ears that I have here, although I think they turned out pretty cool, a little 3D.
I borrowed this nifty cake knife from my mom. It has a very teeny serrated edge and made a really clean cut.
Technically I stole it, but I plan on returning it to her drawer before she has to make my nephew's cake in 2 weeks so she'll never know. Unless, of course she reads my blog. I ain't skeered.

After leveling the cakes I decided that I'd like my ears to be recessed into the Mickey head not just sticking out on top. To do this I laid the 6" cake pans on top of the 10" cake to figure out where they should go. Then cut around the pan on one side. To make sure they were the same size I then lined the cut out piece up on the other side and cut around it. NOTE: use the bottom of the pan it is closer to the size of the cake. Yeah, hind sight is 20/20.
Stack the cut out 10" cake on top of the other 10" cake and cut the ear spaces out of the bottom cake.

The next part is sandwiching everything together with icing. Which brings another opportunity for you to learn from me and do as I say, not as I do. Or did, rather. While making Wilton's chocolate butter cream icing ( I used Hershey's Dark coco powder instead of regular) I doubled the Butter, shortening and vanilla but forgot to double the coco powder or the sugar. OOPS. Fortunately it was only the filling and it tasted fine, just a little creamier. I realized the mistake before I made another batch to ice the cake. This could have been avoided by starting the cake earlier than 3 hours before the party and not being rushed. This little screw up cost me time and money. The icing I had worked fine for filling but was too creamy for decorating and didn't produce the volume I needed so I had to make more. The second batch of chocolate icing used up my remaining butter and almost all of my shortening and I still had to make pink icing for my dots. LUCKILY our Publix bakery sells it's butter cream icing by the pound or other increments if there is bakery personnel to modify it for you. If someone is working in the bakery they will also color it for you. Of course no one was so I had to do it myself or at least delegate the task to my hubby.
Lay out 1 layer of your cakes (1 10" 2 6") and put the ears in place. Spread the desired amount of icing over all of the cakes then stack the remaining cakes on top. In these pictures you can see how I had to build up the ears with the tops I cut off of the 10" cakes. You can also see how how it looks if you can make the ears flat instead of super puffy.
Brandon decided to smooth a bit of icing on the sides of the ears to fill in the gaps where we built them up. You won't see this later b/c we're going to ice over it.


After we had the whole cake together I asked Brandon to place the polka dot outlines while I mixed up the second (correct) batch of chocolate icing. I gave him a small dish of powdered sugar and half of a small plastic Easter egg and showed him how. I dipped the open end of the egg into the sugar then pressed it lightly onto the cake. VOILE! He thinks I'm a genius. I left the polka dot placement up to his discretion. :)

Here comes the fun part. Icing. If you do not decorate cakes regularly I recommend THESE disposable decorating bags by Hutzler. They come w/ 3 decorating tips (2 different sized star tips and a piping nozzle) you'll need a smaller start tip than what comes in this package to do detailed stuff but for large spaces these are perfect and you can just throw the bag out and not worry about cleaning all that icing. Normally I'm a reusable kind of gal but I can live with throwing out 2 or 3 decorating bags a year. If I used them more regularly I would certainly invest in reusable bags.
I used a medium sized star tip to ice the entire cake. My mom always decorates cakes this way and I like the look it gives. It has texture and depth. I thought it was best to start by outlining all of the dots. It is easy enough to squish an extra star into an empty space but if you get to a place on the outline where there isn't enough room then it will make your polka dot wonky. After outlinining the dots I filled in all of the rest of the chocolate icing. While I was doing this Brandon ran to Publix to get that butter cream icing I needed for the pink dots. (HEY! There is a hidden mickey in this picture LOL)

Finally fill in all of the polka dots with any color you like. My princesses like pink, of course. I love brown and pink plus the color combination allowed me to use chocolate icing which is my favorite. I'm a little selfish when it comes to cake.

I meant to put their names on the cake. Oh well, it was pretty anyway and there's always next year.
I have NEVER decorated a cake. I have rarely even made a cake, though I bake quite a lot. I've attempted to make them and decorate them for my childrens birthdays but they have always ended up being decorated by my mom. My mom makes cakes that
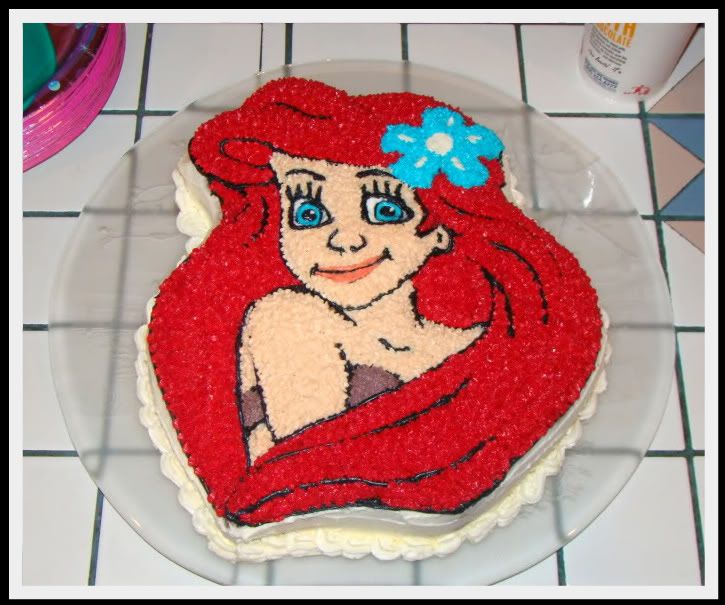 look like this (Lily's 4th birthday cake.)
She and a friend worked in a grocery store bakery when I was a child and eventually started decorating cakes for local families from our house. She is an artist and cakes were only one way for her to express her talents. I am NOT an artist. I do not have her keen eye or steady hand. Any attempt at cake decorating turned into my mother stealthily taking over the icing bag. One year I wanted to make a Buzz light year cake for my son. She let me do the sky. Truth be told I probably never really minded her doing the work because then I didn't have to submit my sub par work for her approval.
THAT ALL CHANGED TODAY! I was resolved that this year I WOULD make the girls birthday cake (it was a joint party for both of my girls Violet's on the 10th and Lily's on the 19th). I had seen a mickey icon inspired cake on the web and thought "HEY! I can do that!" Did I bookmark the instructions? No. Could I find them after an hour of scouring the net? No. I would have to go it alone. Or at least with only the help of my dear husband Brandon, who is himself an artist so I was glad to have his eyes (and sometimes hands) on the project.
Aside from giving you a glimpse into my first try at cake decorating and my love of cake I'm also letting you in on another favorite (read: obsession) of mine. The Mouse. I love all things Disney. I live a short one hour and 50 minutes, door to door, from The World. Fortunately my kids and my hubby love Disney too or at least he tolerates it for us.
NOTE: I am generally the crafting for dummies test subject. If I can do it I usually feel pretty confident that ANYONE can do it. This is certainly no exception to that. I have little to NO cake decorating experience and few actual decorating tools.
Here we go, my first tutorial. HOW TO MAKE A MICKEY ICON CAKE.
THIS is what it looks like finished. It is not a precise thing, there was a lot of playing and fidgeting. So if yours looks slightly different that's ok, as long as it looks like a Mickey head ;) I wish the pictures were better, the silver tin foil isn't the best background and I was using my dad's camera which I was not at all familiar with. I will work on better pictures in the future. It's really not wonky, it's just the angle.

I made it with polka dots so the girls would say it was a Minnie cake. Polka dots always mean Minnie Mouse and I couldn't wrap my head around making a bow.
For this cake start with 2 10" round cakes and 2-4 6" round cakes. Preferably 4. I over filled my 6" pans and didn't have another cake mix (I did NOT make these from scratch *gasp*) so I tried to make due with the 2 I had. You'll see
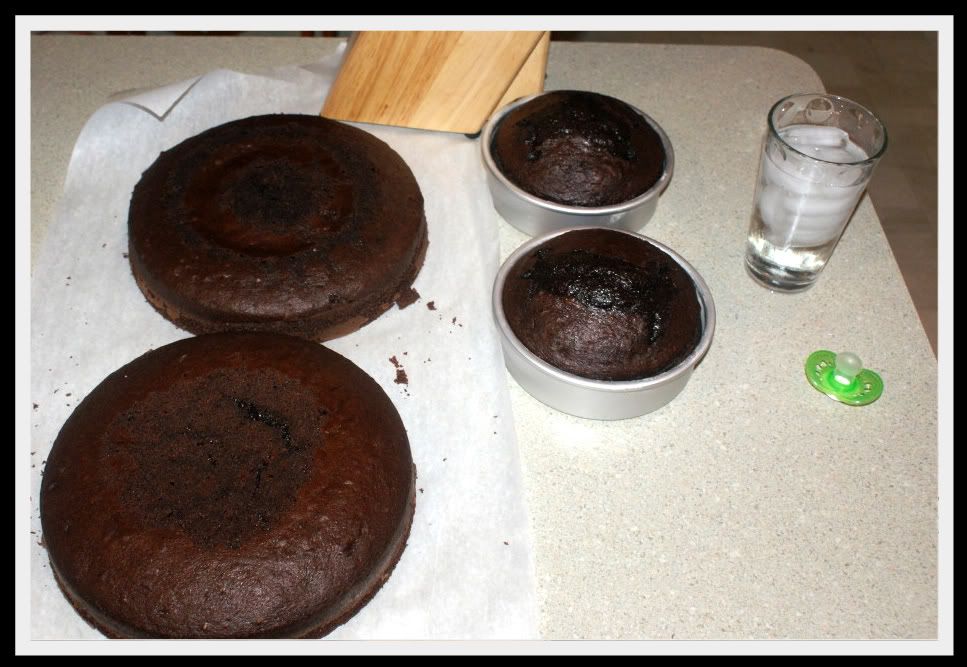 that fiasco a little later. The Nuk is not necessary.
Because I over filled my 6" pans they were considerably taller than my 10" cakes. They weren't quite as tall, however, as my 2 10" cakes stacked. My clever answer to this was to shave the rounded top part of the 10" cakes to make them flatter and a little shorter. That still didn't make the 10" cakes short enough so I had to make the 6" cakes a little taller. I cut them in half and when we added filling I also added pieces of the tops I cut off of the 10" cakes.
THIS is where you learn from my fumbling mistakes and fill ALL of the 2" deep pans equally so that they are all relatively the same height. Make 4 normal sized 6" cakes and bypass that whole shaving and filling part. Filling the pans correctly will also eliminate the rounded puffy ears that I have here, although I think they turned out pretty cool, a little 3D.
I borrowed this nifty cake knife from my mom. It has a very teeny serrated edge and made a really clean cut.
Technically I stole it, but I plan on returning it to her drawer before she has to make my nephew's cake in 2 weeks so she'll never know. Unless, of course she reads my blog. I ain't skeered.
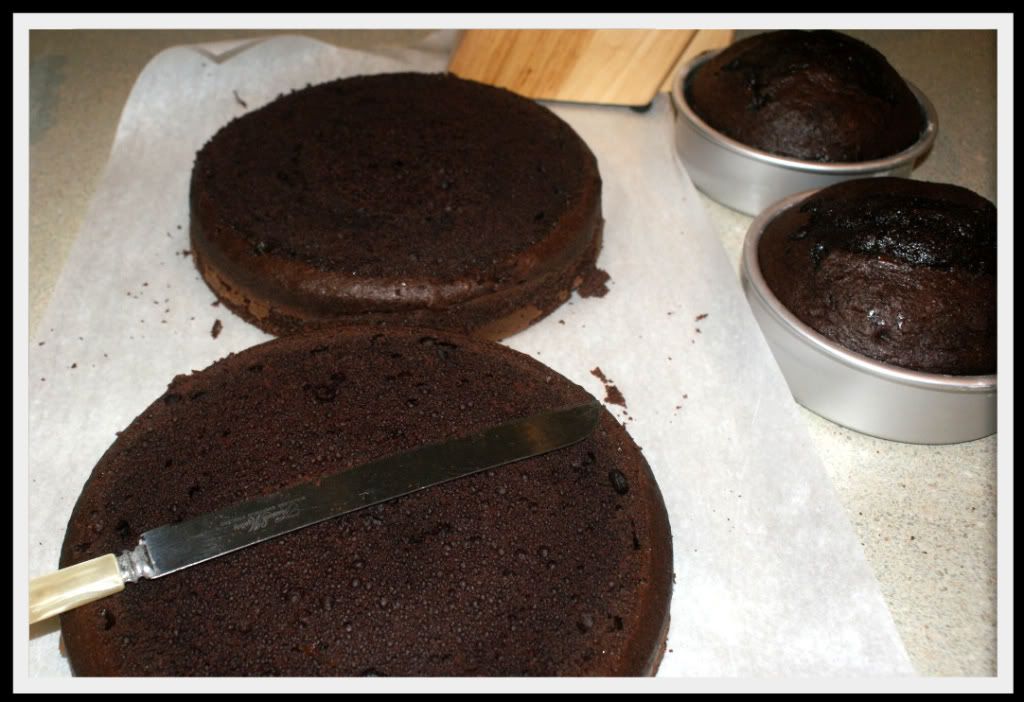
After leveling the cakes I decided that I'd like my ears to be recessed into the Mickey head not just sticking out on top. To do this I laid the 6" cake pans on top of the 10" cake to figure out where they should go. Then cut around the pan on one side. To make sure they were the same size I then lined the cut out piece up on the other side and cut around it. NOTE: use the bottom of the pan it is closer to the size of the cake. Yeah, hind sight is 20/20.
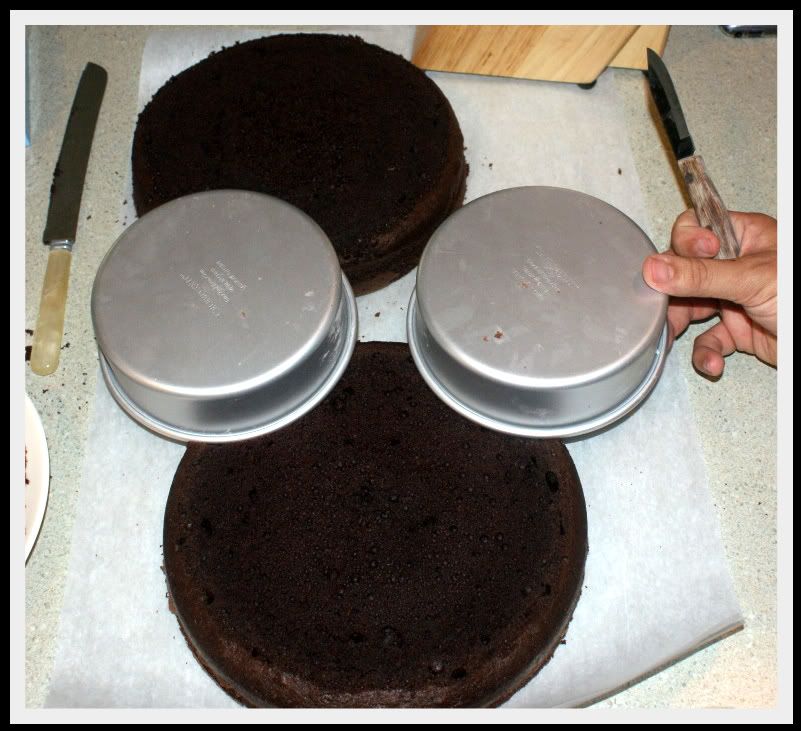
Stack the cut out 10" cake on top of the other 10" cake and cut the ear spaces out of the bottom cake.

The next part is sandwiching everything together with icing. Which brings another opportunity for you to learn from me and do as I say, not as I do. Or did, rather. While making Wilton's chocolate butter cream icing ( I used Hershey's Dark coco powder instead of regular) I doubled the Butter, shortening and vanilla but forgot to double the coco powder or the sugar. OOPS. Fortunately it was only the filling and it tasted fine, just a little creamier. I realized the mistake before I made another batch to ice the cake. This could have been avoided by starting the cake earlier than 3 hours before the party and not being rushed. This little screw up cost me time and money. The icing I had worked fine for filling but was too creamy for decorating and didn't produce the volume I needed so I had to make more. The second batch of chocolate icing used up my remaining butter and almost all of my shortening and I still had to make pink icing for my dots. LUCKILY our Publix bakery sells it's butter cream icing by the pound or other increments if there is bakery personnel to modify it for you. If someone is working in the bakery they will also color it for you. Of course no one was so I had to do it myself or at least delegate the task to my hubby.
Lay out 1 layer of your cakes (1 10" 2 6") and put the ears in place. Spread the desired amount of icing over all of the cakes then stack the remaining cakes on top. In these pictures you can see how I had to build up the ears with the tops I cut off of the 10" cakes. You can also see how how it looks if you can make the ears flat instead of super puffy.
Brandon decided to smooth a bit of icing on the sides of the ears to fill in the gaps where we built them up. You won't see this later b/c we're going to ice over it.


After we had the whole cake together I asked Brandon to place the polka dot outlines while I mixed up the second (correct) batch of chocolate icing. I gave him a small dish of powdered sugar and half of a small plastic Easter egg and showed him how. I dipped the open end of the egg into the sugar then pressed it lightly onto the cake. VOILE! He thinks I'm a genius. I left the polka dot placement up to his discretion. :)

Here comes the fun part. Icing. If you do not decorate cakes regularly I recommend THESE disposable decorating bags by Hutzler. They come w/ 3 decorating tips (2 different sized star tips and a piping nozzle) you'll need a smaller start tip than what comes in this package to do detailed stuff but for large spaces these are perfect and you can just throw the bag out and not worry about cleaning all that icing. Normally I'm a reusable kind of gal but I can live with throwing out 2 or 3 decorating bags a year. If I used them more regularly I would certainly invest in reusable bags.
I used a medium sized star tip to ice the entire cake. My mom always decorates cakes this way and I like the look it gives. It has texture and depth. I thought it was best to start by outlining all of the dots. It is easy enough to squish an extra star into an empty space but if you get to a place on the outline where there isn't enough room then it will make your polka dot wonky. After outlinining the dots I filled in all of the rest of the chocolate icing. While I was doing this Brandon ran to Publix to get that butter cream icing I needed for the pink dots. (HEY! There is a hidden mickey in this picture LOL)

Finally fill in all of the polka dots with any color you like. My princesses like pink, of course. I love brown and pink plus the color combination allowed me to use chocolate icing which is my favorite. I'm a little selfish when it comes to cake.

I meant to put their names on the cake. Oh well, it was pretty anyway and there's always next year.
Saturday, July 10, 2010
Winner Winner, Chicken Dinner!!
Thank you all VERY much for all of the wonderful comments. Even if I did bribe you for them. After much debate I decided that if I pay to use the drawing generator at Random.org then that would be less money for other give aways. So you're just going to have to trust me and the FREE random # generator @ mathgoodies
and the winner is....TRICIALEE!!! (#4) Congratulations, Tricia, I'll e-mail you for mailing info ;) I can't wait to see what you do with the fabric.
Well, well, well. Today is the one year anniversary of the birth of my darling Violet Cincinnati. Violet was born at Labor of Love, a natural birthing center in Tampa, FL. Mama was attended by a super wonderful Midwife named Andrea and a birthing assistant, Meli. I was glad to have both of these lovely women by my side for the day. I went in a little earlier than necessary it turned out (I was nervous and impatient. The center was an hour away and Brandon decidedly was NOT delivering her in the bathroom after hearing a story from a Diva LOL) Her Dadda, Nona, Pop and big sister Liliana were there to keep Mama company and welcome the new baby into the world. Brandon is an excellent labor partner and I have been lucky to have him by my side for the birth of our daughters. He is silent (always, the very opposite of me) and comforting and never left my side. He is in charge of the media. I don't mean calling the news crews, he's in charge of bringing music and dvd's to keep me entertained or relaxed as needed. He is the master of the mixed tape and made me a WONDERFUL labor cd. Of course, he also thinks he's funny so he brought Juno for us to watch. Which we did. Luckily we'd had a couple of false alarms during which we figured out how to work the dvd player. The labor was mostly uneventful. We were hoping for a water birth but it didn't really work out that way. That was a blessing in disguise because Vi got stuck a little and required a bit of extra assistance making her way out. She was my longest labor and the biggest of my 3 babies at 21.5" long and 8 pounds 9 ounces. PHEW!!! We didn't know she was a she and hadn't settled on a name if she was. So, Violet was nameless for 3 days and pretty much down to the wire. Now, I can't imagine for one minute that her name could have been anything else.

HAPPY FIRST BIRTHDAY SWEET SWEET VIOLET!
I had hoped to have a better blog update for you today but a sick birthday girl has kept my arms otherwise occupied. If she sleeps for me tonight I will catch up! There is a cake in progress ;) I LOVE cake.
and the winner is....TRICIALEE!!! (#4) Congratulations, Tricia, I'll e-mail you for mailing info ;) I can't wait to see what you do with the fabric.
Well, well, well. Today is the one year anniversary of the birth of my darling Violet Cincinnati. Violet was born at Labor of Love, a natural birthing center in Tampa, FL. Mama was attended by a super wonderful Midwife named Andrea and a birthing assistant, Meli. I was glad to have both of these lovely women by my side for the day. I went in a little earlier than necessary it turned out (I was nervous and impatient. The center was an hour away and Brandon decidedly was NOT delivering her in the bathroom after hearing a story from a Diva LOL) Her Dadda, Nona, Pop and big sister Liliana were there to keep Mama company and welcome the new baby into the world. Brandon is an excellent labor partner and I have been lucky to have him by my side for the birth of our daughters. He is silent (always, the very opposite of me) and comforting and never left my side. He is in charge of the media. I don't mean calling the news crews, he's in charge of bringing music and dvd's to keep me entertained or relaxed as needed. He is the master of the mixed tape and made me a WONDERFUL labor cd. Of course, he also thinks he's funny so he brought Juno for us to watch. Which we did. Luckily we'd had a couple of false alarms during which we figured out how to work the dvd player. The labor was mostly uneventful. We were hoping for a water birth but it didn't really work out that way. That was a blessing in disguise because Vi got stuck a little and required a bit of extra assistance making her way out. She was my longest labor and the biggest of my 3 babies at 21.5" long and 8 pounds 9 ounces. PHEW!!! We didn't know she was a she and hadn't settled on a name if she was. So, Violet was nameless for 3 days and pretty much down to the wire. Now, I can't imagine for one minute that her name could have been anything else.

HAPPY FIRST BIRTHDAY SWEET SWEET VIOLET!
I had hoped to have a better blog update for you today but a sick birthday girl has kept my arms otherwise occupied. If she sleeps for me tonight I will catch up! There is a cake in progress ;) I LOVE cake.
Tuesday, June 29, 2010
WELCOME!!!
Here it is. The official first t-beri blog. I know some of you have been waiting (why? I don't know) and some of you are thinking "Who the heck is this chic?" I hope I don't let anybody down.
While making the leap into the blogosphere I was sitting at my computer thinking. Why would anyone visit my blog? What do I have to tell them or show them to bring them to my blog. Well, How about a GIVE AWAY? I am after all not above bribery. And what would I give away? How about some of my favorite things from some of my favorite people? It'll help you get to know me.
I am a lover, sewer and collector (some might say hoarder) of fabric. You know, the kind of fabric that you just CAN'T bear to pass up because it is gorgeous and soft and loverly. The kind that you pass over in your stash every time you have a project because then you wouldn't have any left thus forcing you to go to the fabric store to buy more fabric. I'm also a sucker for anything with a vintage feel.
Enter Jennifer Paganelli and Sis Boom Fabrics. Jennifer is such a great gal, she has an awesome blog on which she shares news on her upcoming fabric lines, patterns and lots of pictures of sewing inspiration. Her fabrics are vibrantly full of color and nostalgia (much like I imagine Jennifer in person having only chatted with her via e-mail or facebook). I love them and now I want to share them with you, so let's give some away.
A 5 fabric fat quarter bundle of SisBoom fabrics

And then I thought...hmmmm. You know what would go REALLY great with that FQ bundle? One of the most awesome and indispensable patterns ever!
The Scientific Seamstress, who you may know as Carla C. of Carla C. Dolly Designs, has the best patterns ever. There are 3 in particular that I refer to as the Carla C Trifecta. The Simply Sweet Tops and Dresses, Portrait Peasant and Easy Fit Pants patterns are timeless, simple, versatile patterns that NOONE should be without. Seriously you can make anything with these 3 patterns. Carla's detailed photo tutorials walk you through even the simplest sewing techniques so they are completely beginner friendly and they offer lots of options and altering potential for the seasoned seamstress (you know, for all of you out there who love to make a Franken-pattern). Scientific Seamstress patterns come in a HUGE range of sizes in one pattern, most are 6 months to 8 years (some have even MORE sizes!) and nearly all include a doll sized version. Talk about value! Check out Carla's blog for nifty tricks and tips including how to make the Easy Fit Pants reversible and how to make the Simply Sweet into princess dresses.
Since my favorite thing to do with a cute FQ bundle is to use the Simply Sweet jumper bodice and add a stripwork skirt to it I thought I'd give out a copy of the Scientific Seamstress NEW paper pattern of the Simply Sweet Tops and Dresses.
Scientific Seamstress paper patterns are brand new (for all of you pdf pattern hold outs!) and just hitting the shelves.

To enter the give away I only ask one thing. That you leave me a comment and tell me how awesome I am. One winner will be drawn on my little Violet's first birthday July 10th by random.org
Then if I still have your attention I might tell you a little bit about myself.
...t.
While making the leap into the blogosphere I was sitting at my computer thinking. Why would anyone visit my blog? What do I have to tell them or show them to bring them to my blog. Well, How about a GIVE AWAY? I am after all not above bribery. And what would I give away? How about some of my favorite things from some of my favorite people? It'll help you get to know me.
I am a lover, sewer and collector (some might say hoarder) of fabric. You know, the kind of fabric that you just CAN'T bear to pass up because it is gorgeous and soft and loverly. The kind that you pass over in your stash every time you have a project because then you wouldn't have any left thus forcing you to go to the fabric store to buy more fabric. I'm also a sucker for anything with a vintage feel.
Enter Jennifer Paganelli and Sis Boom Fabrics. Jennifer is such a great gal, she has an awesome blog on which she shares news on her upcoming fabric lines, patterns and lots of pictures of sewing inspiration. Her fabrics are vibrantly full of color and nostalgia (much like I imagine Jennifer in person having only chatted with her via e-mail or facebook). I love them and now I want to share them with you, so let's give some away.
A 5 fabric fat quarter bundle of SisBoom fabrics

And then I thought...hmmmm. You know what would go REALLY great with that FQ bundle? One of the most awesome and indispensable patterns ever!
The Scientific Seamstress, who you may know as Carla C. of Carla C. Dolly Designs, has the best patterns ever. There are 3 in particular that I refer to as the Carla C Trifecta. The Simply Sweet Tops and Dresses, Portrait Peasant and Easy Fit Pants patterns are timeless, simple, versatile patterns that NOONE should be without. Seriously you can make anything with these 3 patterns. Carla's detailed photo tutorials walk you through even the simplest sewing techniques so they are completely beginner friendly and they offer lots of options and altering potential for the seasoned seamstress (you know, for all of you out there who love to make a Franken-pattern). Scientific Seamstress patterns come in a HUGE range of sizes in one pattern, most are 6 months to 8 years (some have even MORE sizes!) and nearly all include a doll sized version. Talk about value! Check out Carla's blog for nifty tricks and tips including how to make the Easy Fit Pants reversible and how to make the Simply Sweet into princess dresses.
Since my favorite thing to do with a cute FQ bundle is to use the Simply Sweet jumper bodice and add a stripwork skirt to it I thought I'd give out a copy of the Scientific Seamstress NEW paper pattern of the Simply Sweet Tops and Dresses.
Scientific Seamstress paper patterns are brand new (for all of you pdf pattern hold outs!) and just hitting the shelves.

To enter the give away I only ask one thing. That you leave me a comment and tell me how awesome I am. One winner will be drawn on my little Violet's first birthday July 10th by random.org
Then if I still have your attention I might tell you a little bit about myself.
...t.
Subscribe to:
Posts (Atom)